MAKING A MANDOLIN
VISITS
|
MAKING A MANDOLIN
|
|
Visit Hog Time Music website Email me here |
After putting it off for a couple of years, I decided to try and make a mandolin. I already had an A-style, so I decided to make an F-style, although I knew it would be much harder. I definitely didn't want to start from scratch, so I bought a Roger Siminoff kit. I chose this kit because of Roger's good reputation and that fact he's only about 30 minutes away. This way I could take my work-in-progress over to him for some advice. I also bought the Level 1 version kit where much of the difficult work is already done. The kit had these difficult make-from-scratch parts
already done: I've never made a musical instrument before. I have done many "home projects" using hand tools, but don't consider myself a craftsman. Keeping my fingers crossed on this one. My goal: Build a mandolin that plays well and sounds good. If it doesn't look professionally built, I can accept that (since I'm no pro) On this webpage I'm going to chronicle my progress as I make the kit, showing pictures of the major steps. Since I'm retired I have plently of time to work on this project. However, I'm going to stop when I get frustrated or my back gets tired. Probably no more than a couple of hours a day. Note: Don't infer how much time anything took by looking at the dates. I travel six months of the year and can't work on my mandolin project then. If you have any questions, email me: |
|
Current Status - 4/20/13: Rim & blocks glued. Kerfing for top glued in. Tone bars glued to inside of top. Top glued on. Fretboard binding on. Neck glued to body. Back kerfing in. Fretboard frets and dots in. Back glued on. Scroll opening sanded even. Body routing done where Dremel tool could be used. Hand routing done around scroll. Bone corner points put on and shaped. Binding installed on top and scraped flush. Binding installed on the back and scraped flush. Peghead binding slot routed. Fingerboard extension "scooped". Peghead bound and inlaid. Fretboard glued on. Neck filed flush to fretboard edge. Many gaps filled. Bridge fitted to top and slotted. Tailpiece on. Nut installed and slotted. Tuners installed. Strings ON! Practicing staining and finishing on "test wood". Almost finished with the sunburst staining on the "real thing". Improving (I hope) the sunburst on the back. Eight coats of KTM-9 water based finish applied. Waiting for the finish to cure before "level sanding". Hard to believe, but IT'S DONE!! |
Here we go: |
|
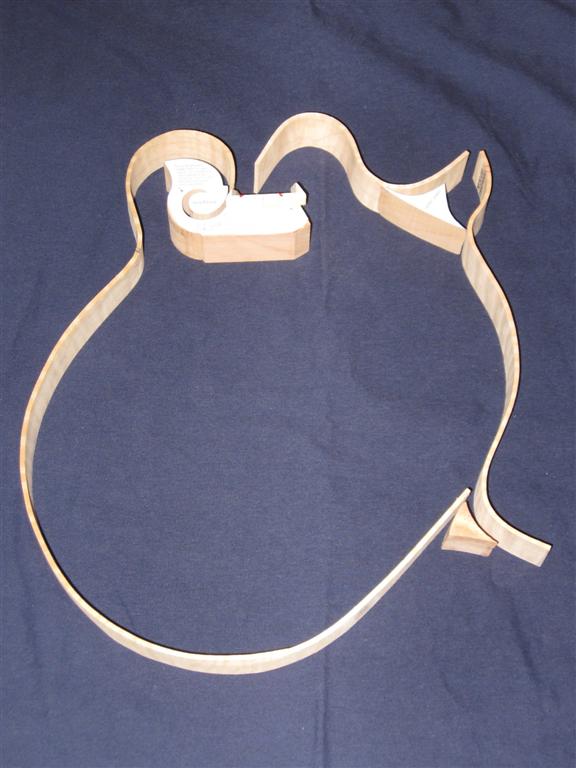
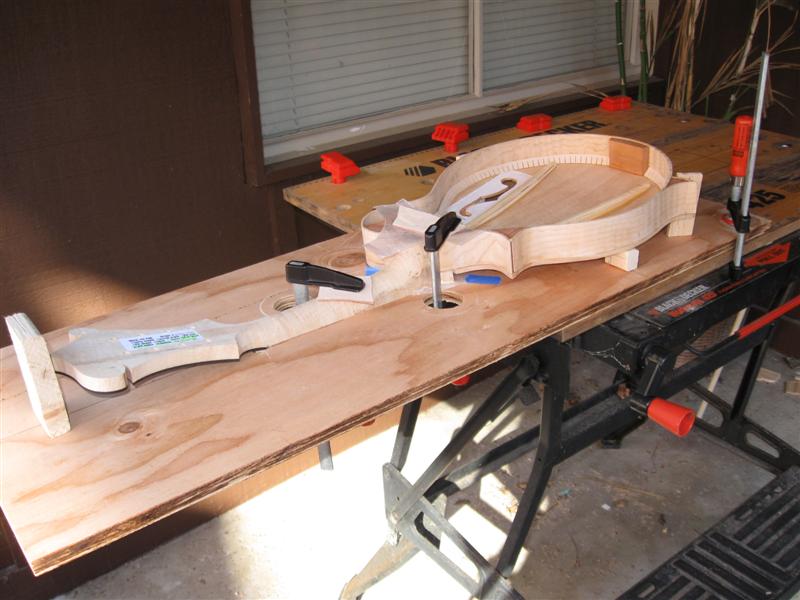
Here are the curved rims and blocks that need to be glued together. The rims haven't been cut to the proper length yet. The large block is for the neck joint. I had Roger cut the V-joint for the neck. Joint is on far side of block. |
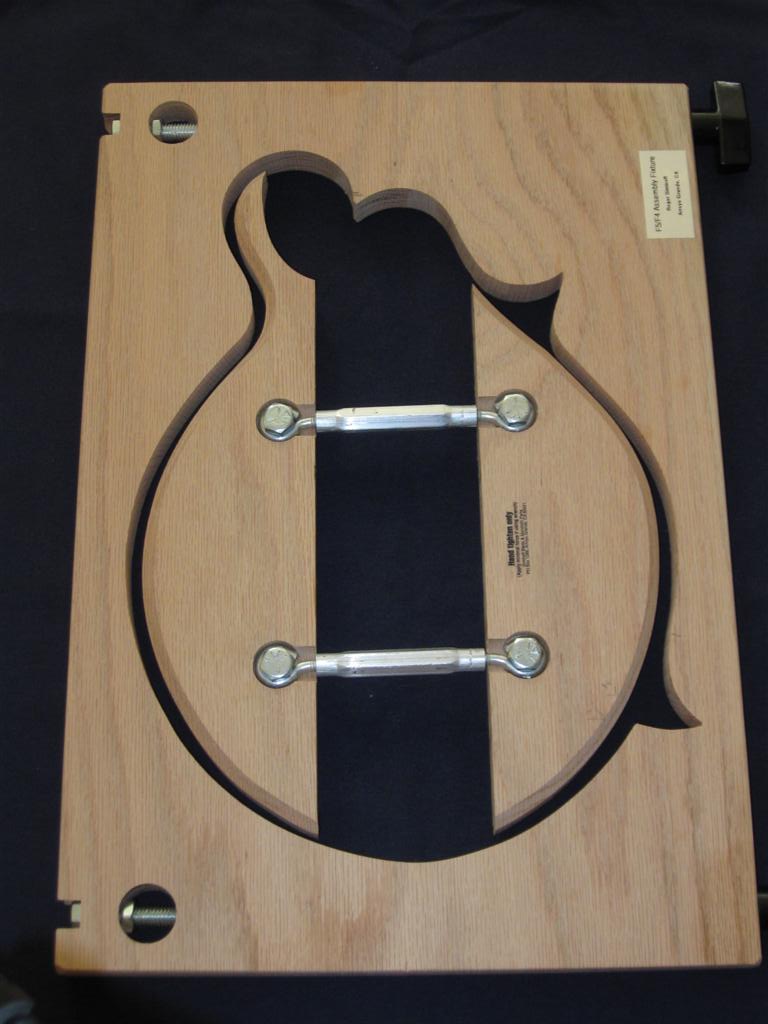
This is the fixture I bought along with my kit to hold the rims/blocks together for gluing. Would have had to build something myself if I didn't buy this. Figured I had enough else to do. Also, should be able to sell it after I've used it. |
|
|
|
|
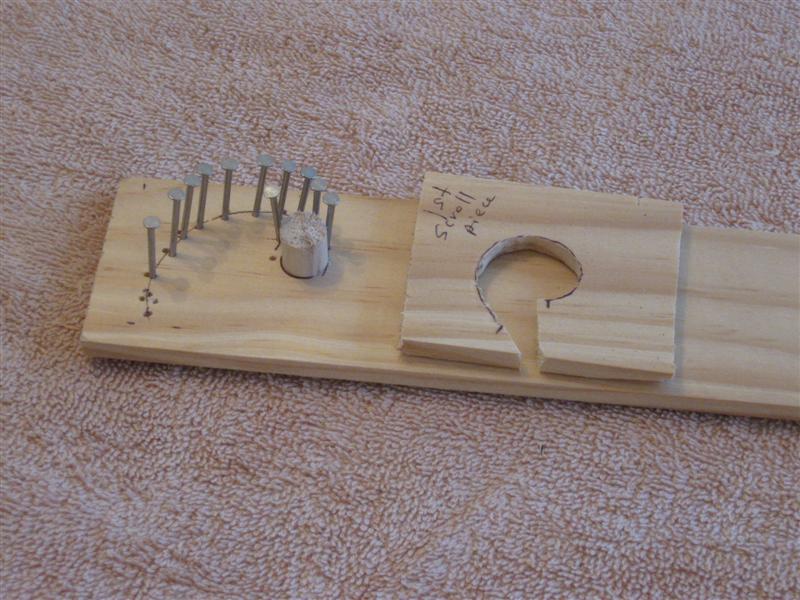
12/14/08: Since I'm not used to working on this detailed of a project, it took quite a bit of time cutting/ filing/sanding the rims to the right size and figuring out how to reduce the gaps between the rims and the blocks. Had to do a lot of head scratching. Got some good tips from Roger and the builders section of the MandolinCafe.com forum on this. After I got this done, I did my first gluing. Had a friend come over to lend me a hand and I'm glad I did. Used several clamps (including a home made one) and some shims made of paperback book cover stock to get the rims closer to the blocks. Not perfect, but hopefully OK. The gaps in rims at the point tips shouldn't be a problem, as there is a bone "corner point" that goes there. If there is a next time, I'll try and get them closer, however. |
|
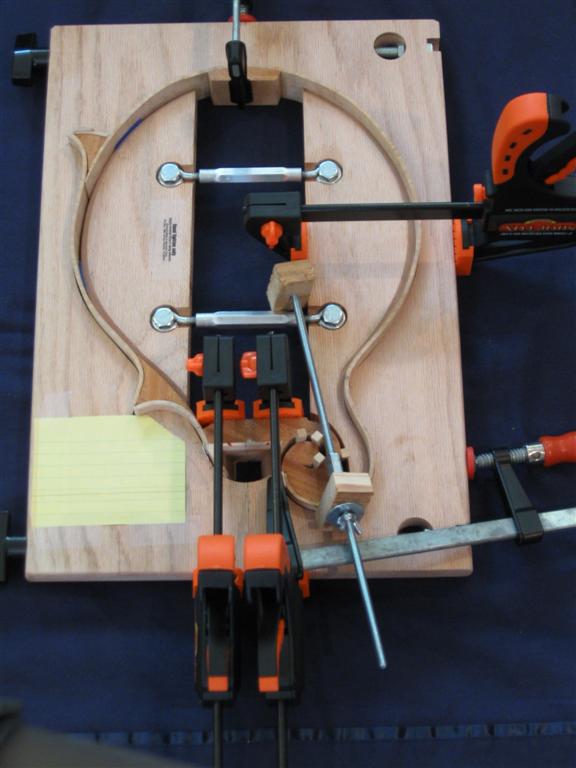
"Clamp City". The wedges in the scroll area are to keep it from cracking. The yellow paper on the fixture was to check the alignment of the neck joint. |
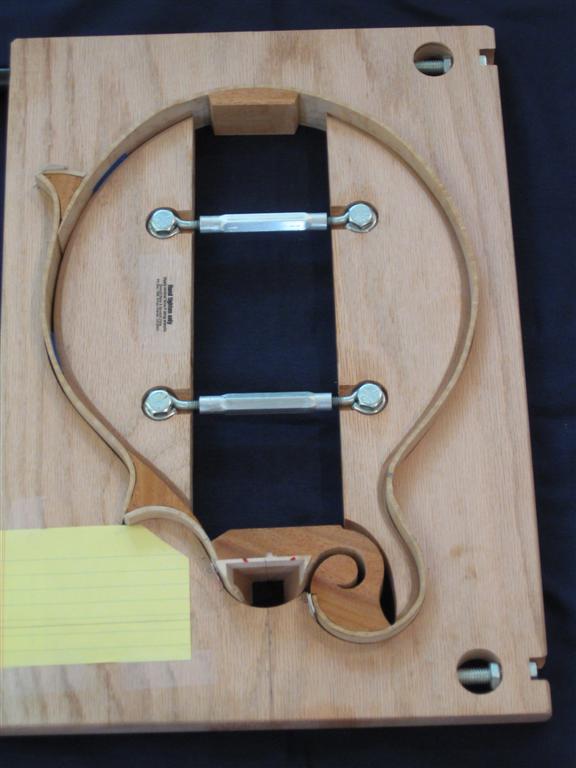
Without the clamps. Ready for attaching the kerfing. When I turned the fixture over I found a place I needed to glue again. The long rim piece at the lower point wasn't touching the shorter piece between the points. |
|
|
|
|
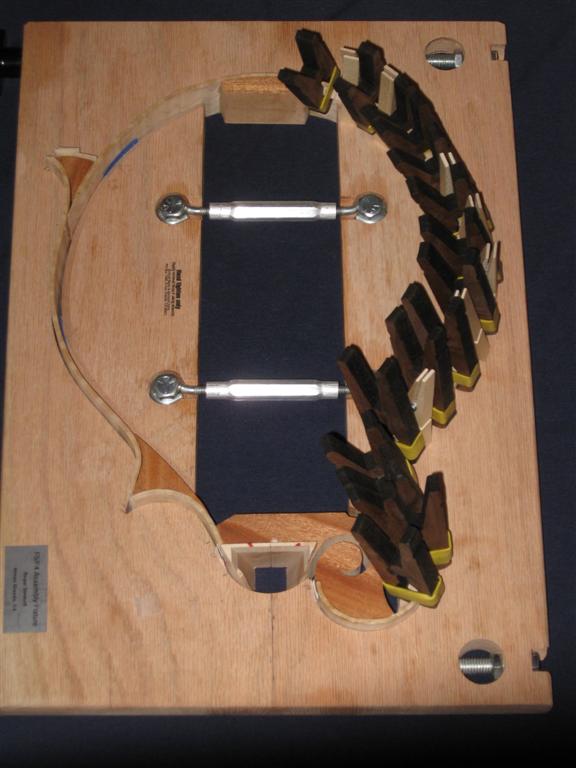
12/21/08: Got the "kerfing" for attaching the soundboard (top) glued to the inside of the rim. The kerfing is a strip of wood that has been cut nearly through every 1/4" to help it bend around the curves of the rim. Due to the sharper curves in the scroll area it broke in a couple of places. Not a problem per Roger's book. It adds to the surface area for gluing the soundboard down. Otherwise, there would just be the 1/8" top of the rim. |
|
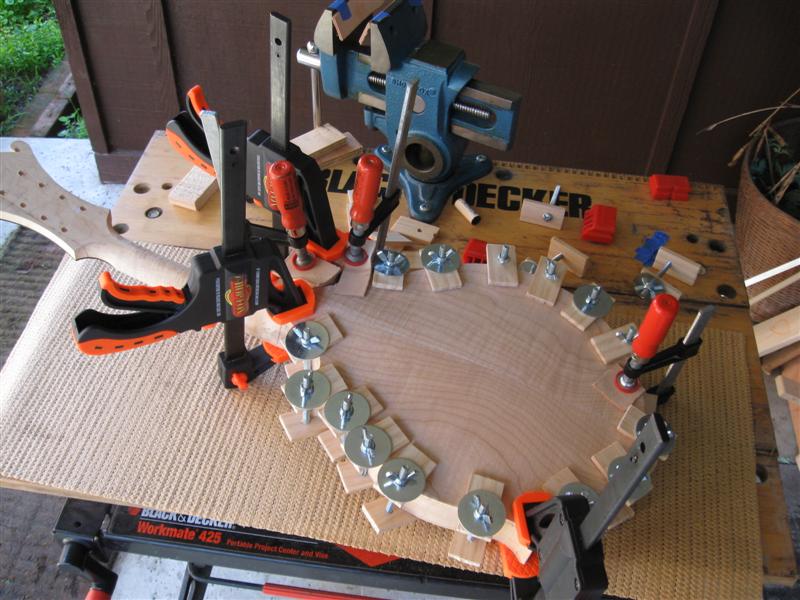
I glued half of the kerfing at a time. Most of the clamps are fancy clothespins I got from Luthier's Merchantile. They are designed for this job and seem to "grab" the kerfing better than clothespins. Didn't quite have enough to go half way around, so I used regular old clothes pins in a few places. The brown clamps use a rubber band for "clamping power". With only one there wasn't enough "pull" to bring the kerfing against the rim at the scroll curves. I took rubber bands off some clamps (that's why I didn't have enough) and added a 2nd one to those clamps in the scroll area. Worked great! |
Here's how things look with the kerfing all the way around. Roger's book said it should be slightly above the top of the rim, then sanded down. This way it should contact the bottom surface of the soundboard for sure. I didn't always accomplish this, but I was at least flush if I wasn't slightly above. Everything is going to get sanded down level before gluing on the soundboard, anyway. A bit of a "boo boo" just before the scroll. A tad of kerfing not against the rim. With the clamps on I didn't see it until too late. No biggie. |
|
|
|
|
12/26/08: Got the inside of the soundboard
(top of mandolin) sanded down and the tone bars glued in. Since the top
is arched, it's a bit tricky to shape the bottom of the tone bars to fit the
soundboard. Roger's book has a good idea for a simple "contour follower"
gizmo that draws a line on the tone bar stock that matches the shape of the
surface. Just made with a small block of wood with a pencil sticking out.
Worked great. However, I still had trouble sanding them down
for a good fit. Ended up just a bit (1/8" -> 1/4") of the
ends in the air. Fortunately,
the ends get shaped down to almost no thickness, anyway. |
|
Here's one tone bar clamped for gluing. I put a piece of wood between the top of the tone bar and the clamps to help distribute the clamp pressure across the tone bar. Seems like it would do that, but I'm no mechanical engineer. The piece of wood by the other f-hole is the raw stock supplied with the kit that has to be shaped to an initial size before gluing to the soundboard. |
Here are both tone bars to their initial shapes and glued in. These bars get shaped later when "tap tuning" the soundboard for a specific note when struck with a small hammer. Or, if this is not done, they get shaped to a "secret, known only to the pro luthiers, if I told you I'd have to kill you" shape. The gauze around the f-holes is to protect the edges from chipping. Came already installed with the kit. |
|
|
|
|
1/05/08: Got the top glued on. Looks pretty good. Had a scary moment when I found the moveable part of the fixture was glued to the inside of rim at one spot. I saw the "glue drip" as I was gluing the rim to the blocks and cleaned up what I could. However, some had already dripped down into the crack. Released the turnbuckle pressure on the fixture and pried it apart with a screwdriver. That loud crack sound sure did scare me when it came loose. :) |
|
Here's the top clamped while the glue dries. A lot of builders use "go-bars" (flexible sticks) that press against a top deck to clamp the top. I modified my fixture for bolts. I'll reuse this hardware when clamping the bottom. I made the large sanding bar at the top of the picture to sand the top of the rim, kerfing and blocks flush. Worked great. I did find a high spot in the head block and sanded it separately with my orbital sander. |
Everything looks pretty good inside. A small section of the kerfing is not right against the rim side (can't see it here), but doesn't move any. The top has a couple of spots where the edge is right at 1/16" inside the outer edge of the rim. Since the binding is 1/16" thick, I think I'm OK. |
|
|
|
|
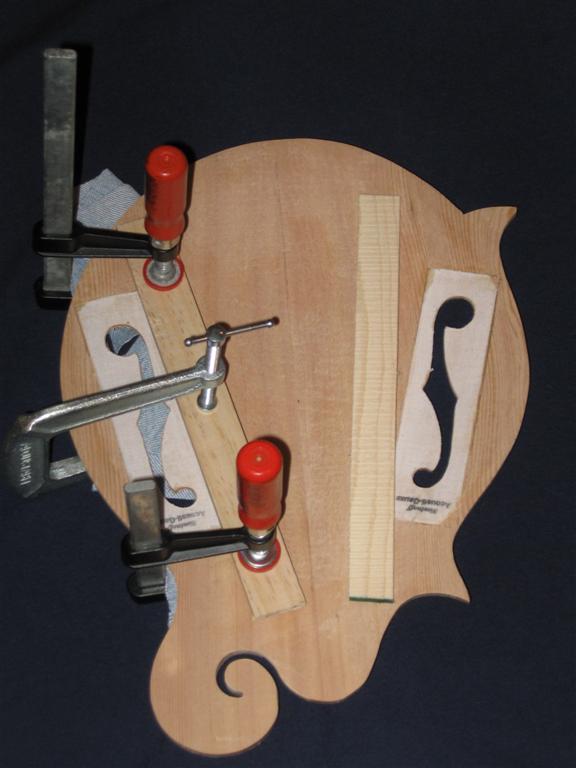
2/3/08: Took a detour and worked on the fretboard binding while getting a problem fixed with the neck. Also built the neck/body gluing fixture and sanded the top flush to the rim. Had quite a bit of problems with gluing the binding to the fretboard. Tried to use "super glue" type glue (CA) for the curved areas, so it would setup fast and I could hold the binding against the curve with my fingers (or a dowel) for 60 seconds or so. Sometimes it stuck and sometimes it didn't. Even using Duco on the straight sections was inconsistent. Might have needed to clean the edges of the ebony fretboard. See the discussion on MandolinCafe.com I started on the subject and the various replies. |
|
Photo below shows one of the clamping sessions for a long section. The front clamp is actually the bending fixture I made (per Roger's book) for bending the binding after heating it. The binding is bent around the dowel and into the "dip" in the adjacent wood. The left dowel is for the curve at the base of the large "thumb" of the fretboard. It's hard to see the thumb section of the fixture due to the photo lighting. |
Here's a view of the finished product. The miter where the two pieces meet turned out better than I expected, but not perfect. Hope the binding doesn't pop off later when I'm in a hot jam. That would be embarassing! |
|
|
|
|
2/5/09: Neck has been glued to the body. Looks like it came out pretty good. |
|
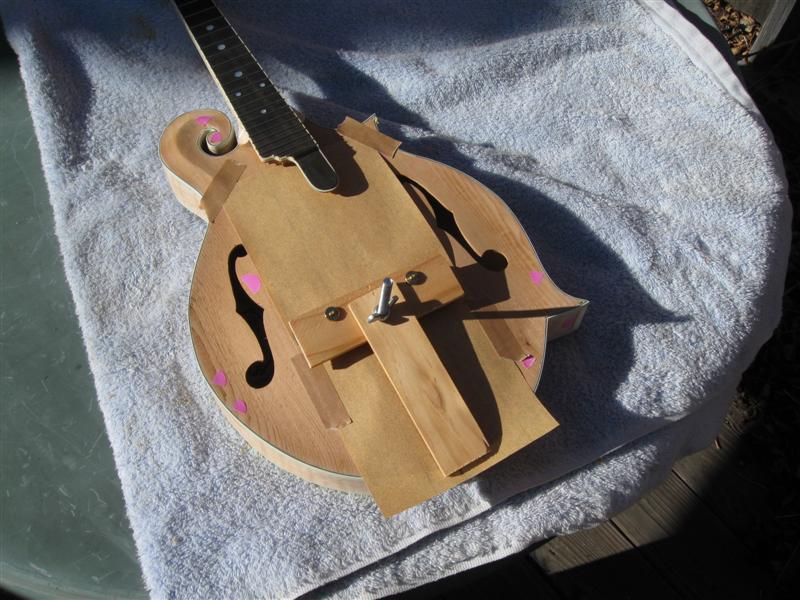
Here's the neck/body gluing fixture. Based on Roger's book, with a few changes, however. Had too much trouble shaping the center support cross piece the full width of the body. So I just have the critical pieces; center and two sides. I added the tall wood piece at left end (with a groove in it) to hold the "point" of the peghead exactly on the centerline. Also added the two vertical "stops" for the body to hold it in the right place. I used a laser level light beam to make sure everything was in line. |
Here's the neck and body clamped down, letting the glue dry. There is waxed paper under the neck joint. That's so my mando doesn't end up glued to the board. Hey, I'm no dummy (well, usually anyway). |
|
|
|
|
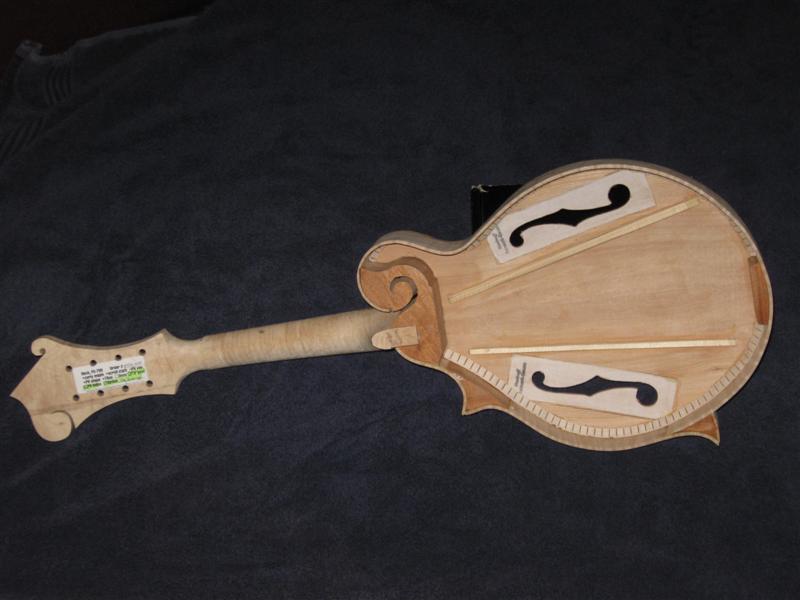
Look Mom, it's a mandolin! |
|
|
|
2/27/09: Tried Siminoff's tap tuning procedure for the tone bars, but didn't finish it. Was getting some inconsistent results with my measuring technique. Took both bars down to around 0.30" high in the center and tapered towards the ends. Left it at that. Glued in the kerfing for the back and sanded it down smooth with the rim top (no tap tuning attempted on the back). Held off installing the back until I could take some thickness measurements of the both the top and back (for possible future reference). Pre and post photos will be posted after I get the back on. 3/6/09: Put in the fretboard position markers, side dots and frets |
|
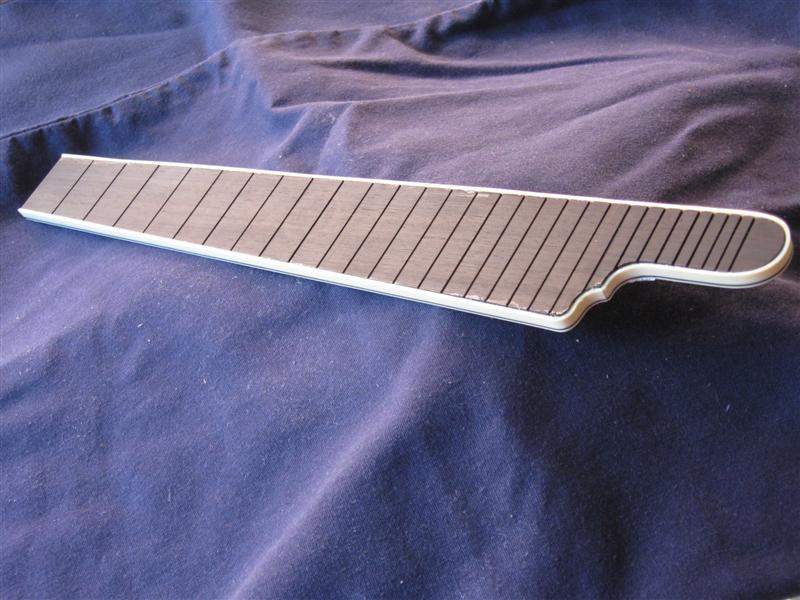
Here's the completed fretboard and the tools used to install frets. I used Simonoff's fret setting tool (the aluminum bar in the middle) with a hammer and it worked well. The masking tape is to keep from scratching the frets (that on the hammer is leftover from something else). It's a real pain to get the frets into the slot for banging on, though. They kept coming out of place when I moved my fingers. The piece to the left of the setting tool is Stewart MacDonald's "fret rocker" (no, it doesn't play R&R) to check for high frets. Yep, got some. Taking care of that comes later. |
Here you can see the side dots. Not real apparent, but I didn't do a great job of centering them vertically in the binding. I was almost ready to put on new binding and try it again. However, I noticed with the fretboard on the neck it wasn't as apparent. Still need to grind down the ends of the frets and level and crown them. Didn't put frets in the narrower extension, as I'm going to "scoop" that area. Don't have teeny enough fingers to play way up there, anyway. :) |
|
|
|
|
3/11/09: Back glued on. |
|
Here's the kerfing in and sanded down. Ready to glue the back on. Note the 2 dowels in the neck joint to provide additional strength. |
Back clamped down and letting the glue dry. Got the nifty vise from Grizzly Industrial. My workbench outside is working out great! Wouldn't be so great in Minnesota this time of year, though. :) |
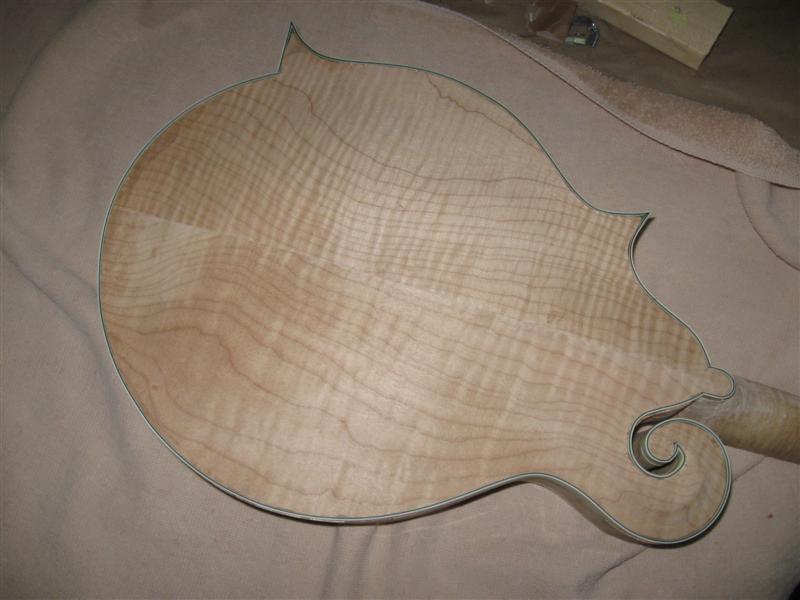
Nice curly maple in this back! So hope I get a decent stain and finish on it at the final step of building. |
|
|
|
|
|
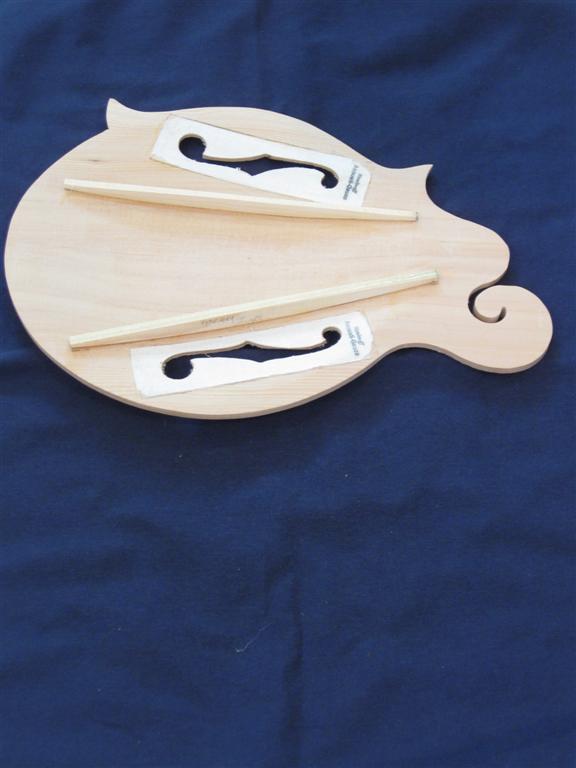
[Back at my project after traveling in my RV several months.] 12/01/09: Scroll opening sanded smooth. The three levels (top, head block, bottom) did not align perfectly, so sanding was needed. I used a combination of small files, sandpaper and sandpaper around files to do it. Took quite a while due to the confined work area, but I kept at it and it came out looking pretty good.. 12/11/09: Body (front and back) routed out for white edge binding using Dremel tool and fixture from Siminoff. Definitely a high anxiety operation. Didn't come out perfect, but better than I expected. Can't use the tool near the scroll or at some areas on the body (like near the points). This requires doing it by hand. Very, very tedious! After I found some better tools, it's going better than at the first. |
|
I clamped the neck into my vise for routing the body with the Dremel tool. The metal gizmo on the end of the Dremel is a special fixture from Siminoff that gives the slot the right dimensions. The slot is not perfect, but pretty good. I must have "wobbled" some. Did make some nicks in the sides, too. |
Here you can see the routing done by the Dremel tool. Note how it couldn't be used all the way around the scroll. Hand work needed here (ugh). |
|
|
|
|
For measuring the depth of the binding slot, while hand routing, I came up with this. Made with brass bar and rod stock. Used super glue to glue the parts together. Since rod is 1/16" (same as binding width) I can also use it to gauge the width of the slot. |
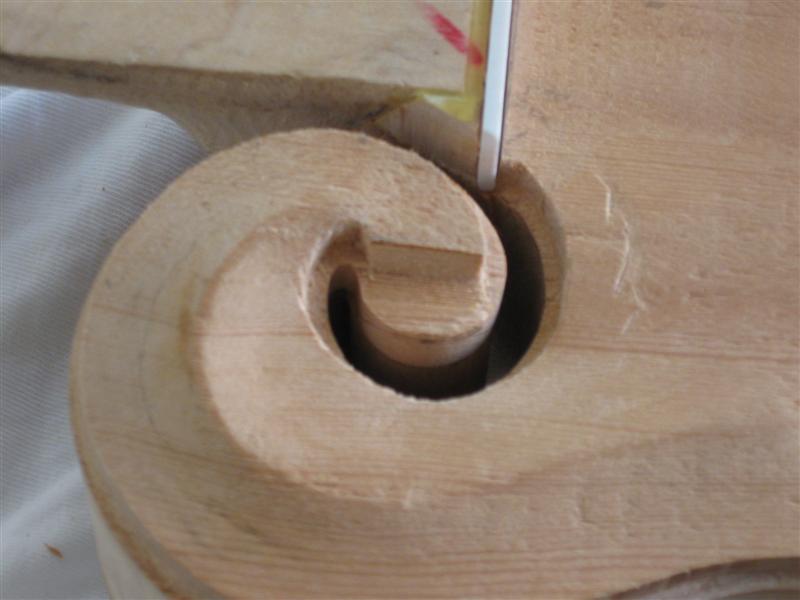
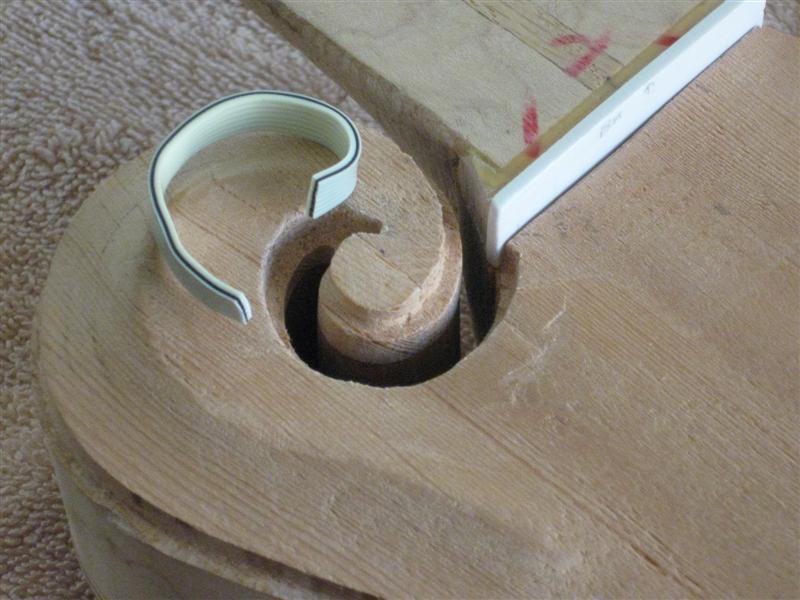
Major boo boo when I started on the hand routing around the scroll. I was using too big of a chisel and part of the scroll "button" came off (see it to right of scroll). #$%*!! I continued to work on the slot (as shown here). Shouldn't have, as now the broken off piece doesn't fit back as perfectly. Should have glued it right back on. |
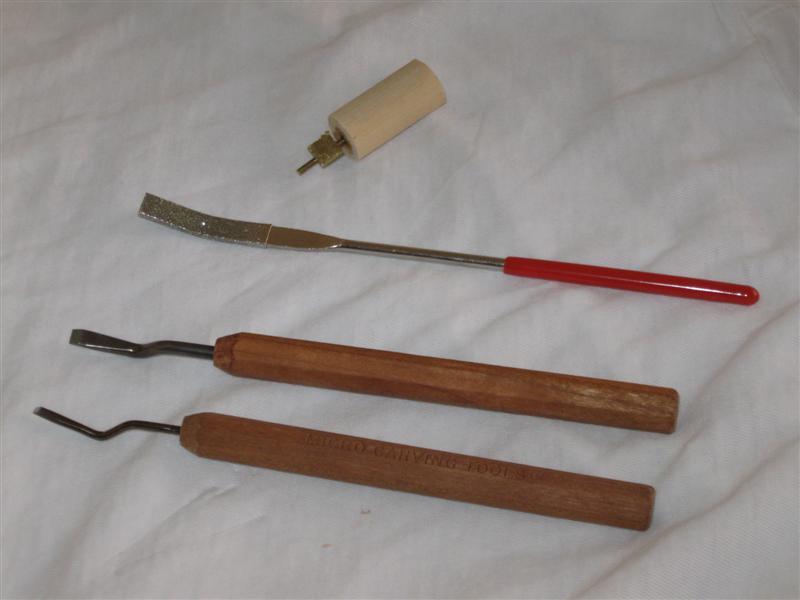
After getting tips from the ever useful builder's section of MandolinCafe.com, I got some better tools for hand routing; dogleg micro-chisels and a riffler (aka small rasp). These made hand routing go much better (but not perfect). |
|
|
|
|
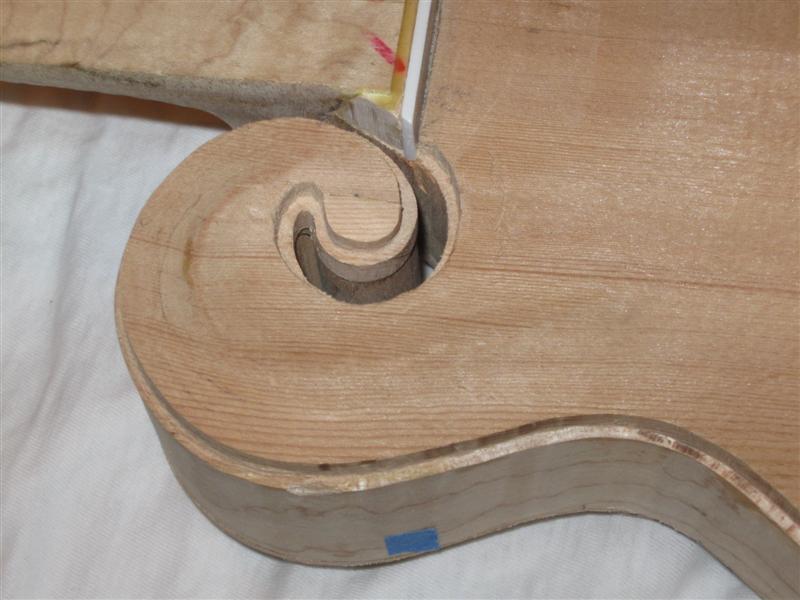
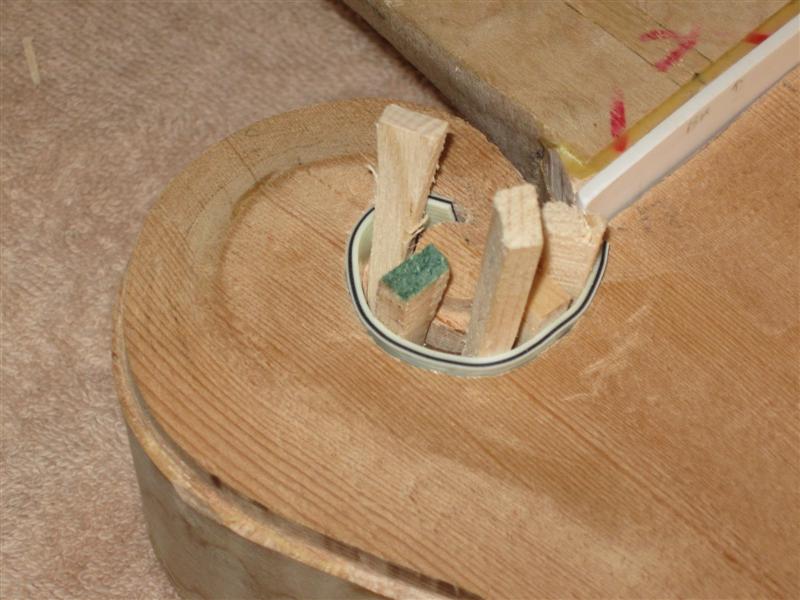
2/08/10: Fixed the broken off piece in the scroll area (see above). Came out pretty good. Put on the bone corner points. Not fully shaped yet. Almost got all the binding slot cleaned up for binding. |
|
Sawed off the broken section with a narrow saw. |
Cut a replacement piece out of some scrap spruce and glued it on |
After cutting the binding slot it looks pretty good! |
|
|
|
|
|
The bone points came roughly cut to size. To start, I just cut them to approximate length and glued them on. |
Here they are without any trimming or shaping. |
After I get them shaped, I'll put a picture here. |
|
|
|
|
|
11/17/10: Now back from my summer travels (see RamblinRalph.com) and ready to make more progress this year than last on my mando. Last year I was working on releasing my own music CD and didn't get much done on the mando. I'm shooting to have it strung up "in the white" (no stain) before I start traveling again in May 2011. First task was to do the binding on the top of the mando. I used a heat gun on the low setting to soften the celluloid binding. Fortunately never started a fire! I got the approximate shape for the binding around the scroll by bending around homemade jigs. Then I held the binding against the mandolin, waved the heat gun over it a few passes and pressed it against the body. The hardest things were bending/gluing around the scroll and mitering the ends of the binding where two pieces meet. Just can't get a decent cut. |
|
I used these jigs to bend the binding to the approximate shape of the scroll section. |
Here's the short scroll piece after shaping it on the jig and the mandolin itself. Note the binding rises up from the neck to the button. |
Glued in with Duco and held in place with wood wedges. |
|
|
|
|
|
Here's the top nearly fully bound. Contrary to the Siminoff book warning about masking tape pulling out fibers of spruce, it worked OK for me. I used some high tack stuff from Stewart MacDonald.. |
|
|
|
Forgot to take a picture when I had the top bound with the tape off. |
|
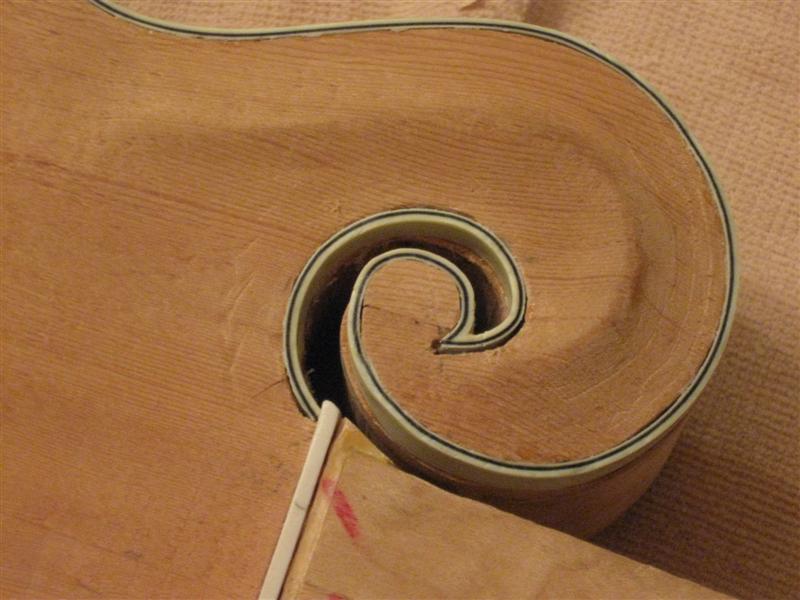
12/08/10: Got the top bound and the binding scraped down to wood level (except around the scroll). I'm pretty happy with the results. Only major problem is the scroll area, where the two pieces don't meet well. That was my first try at mitering, which didn't come out well. Might take the short piece out and redo it. Should have started on the back, where boo boos wouldn't have been noticed as I play. :) |
|
Here's the top with the binding mostly scraped down. I scraped down the binding with a cabinet scraper; a thin piece of hard metal with a small "hook" on the edge (can't really see it, only feel it). I bought mine HERE. Also available at most woodworking tool places. You can also make your own, although I haven't had much luck making the hook. For scraping around the scroll, I cut off a 3/8" wide section of a rectangular scraper. Easier to work with in that small area. |
Here's how bad the short scroll piece binding looked the first try (not scraped down, yet). Poor miter where the two pieces meet; not a smooth curve; large gap at the white plastic cross piece. Ugh!
|
I removed it and put in another piece with much better results. Cutting the miters for the 2 points improved my skills! Note that the curve is smoother from carving out the slot better and the end is flush with the white plastic. Still will need to use some wood filler to fill in the gaps. |
|
|
|
|
|
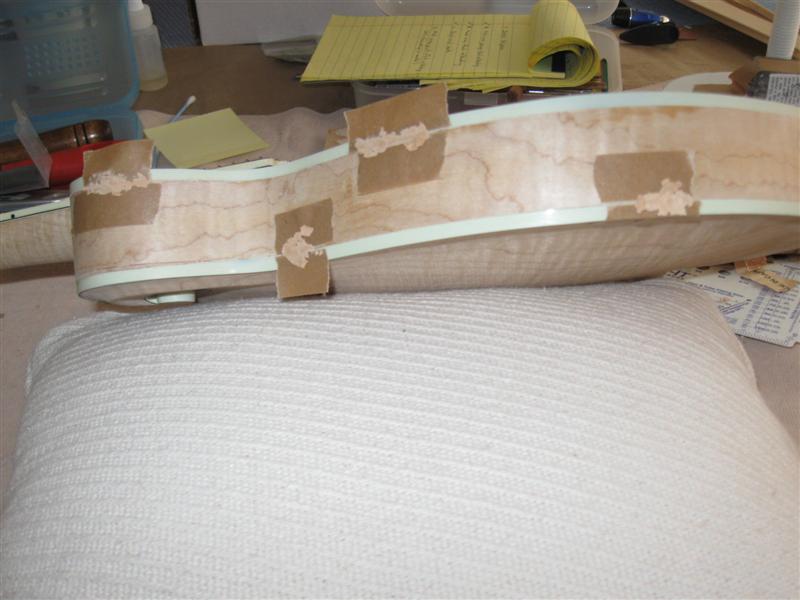
11/19/11: Finished binding the back, but it's not scraped
down flush to the wood yet. Came out pretty good. Some minor boo
boos, but I'm happy with it. Overall, I think the binding is the hardest
work so far. Lots of opportunites for error. If it weren't
for these 3 things, it would be easy: :) |
|
Here's the back with the binding installed, but not scraped down. |
|
|
|
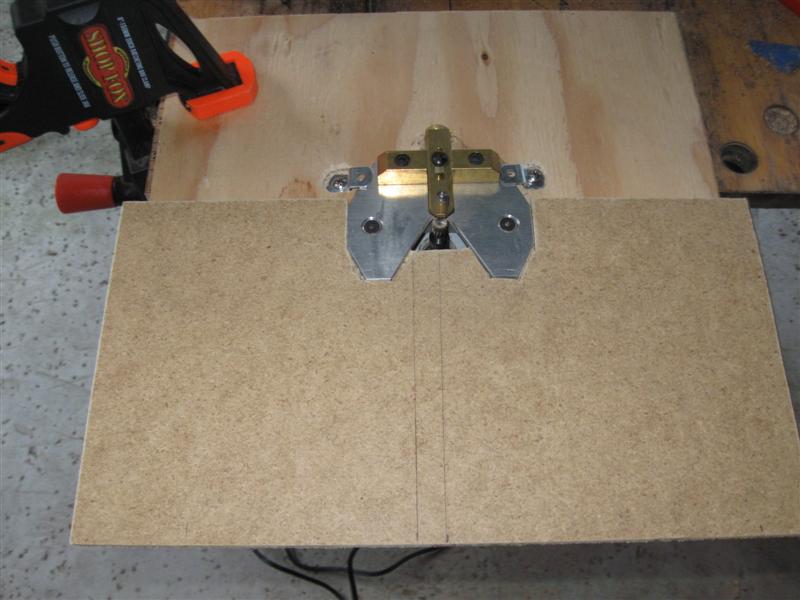
2/1//11: Finished scraping down the binding on the back so it's flush with the back. The back binding came out pretty good, with some minor (for me) problems. Biggest one was that when scraping I put a "dip" in the binding where it ramps up to the scroll. Makes the ramp up look too extreme. Made a quickie router table to use my Dremel with two Stewart McDonald accessories for routing the peghead binding. Tested it on a peghead I cut out of a piece of hardwood. Worked good. However, a somewhat different result on the actual peghead. I forgot to take into account the "slanting" sides of the peghead. These caused the slot to be either too wide (near 2X) or too narrow in spots. Didn't think ahead! %^&*! Going to have to scratch my head and come up with some fix. The slot height came out really good, though. At least some success. The two StewMac accessories I used were: Router Base & Router Edge Guide Note: Edge guide didn't work well on peghead because of its slanting sides. Not recommended for this use. The "stop" (that controls the slot depth) needs to be right above the cutter, so it doesn't sense the slant of the edge. I probably could have rigged something up in place of it, IF I'd had the foresight. |
|
Here's a top view of my quickie router table. I used a piece of 1/8" Masonite (aka hardboard) to make the entire surface flush with the 1/8" thick router base. The screw on the brass piece (edge guide) allows adjustment of the depth of the slot. |
The router table base is a piece of 1/2 inch plywood. I cut a hole in it just large enough for the part of the router base seen here to pass through. The two large screws on the base move the Dremel (and its cutter) up and down and allow very precise adjustment of the slot height. |
Below is the peghead routed out as much as the router cutter could reach. I didn't try the lower right side after I saw the opposite side slot was way too wide. Now I not only have to figure out how to cut the slot where the router bit couldn't reach, but how to fix the "too wide" parts. Ain't this fun! |
|
|
|
|
|
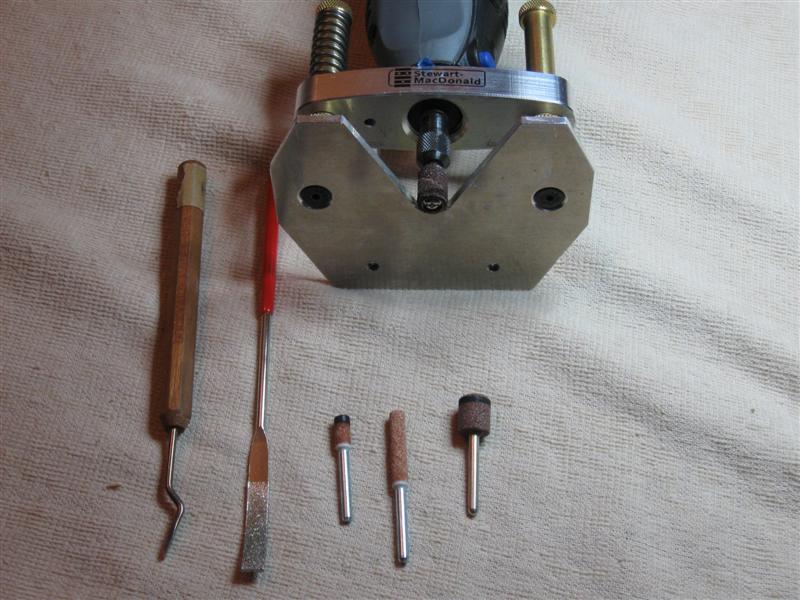
2/6/11: Finished routing the peghead for binding. Came out better in the scroll area than I thought it would. I used my Dremel tool and router base for it. Also used the Dremel to increase the depth of the slot where my initial pass with the edge guide didn't work well. For the scroll area I used a 3/16" diameter grinding "rod" and ran it down the center of the opening. When I got close to the 1/16" slot depth I needed, I switched to a micro-chisel and small riffler file. |
|
Here are most of the tools used to finish routing of the peghead. The short cylindrical grinder is what I used in the scroll curves. It was cut from one the length next to it. For increasing the depth of the slot along the peghead edges, I used both the grinder on the far right and the drum sander shown in the Dremel. The drum sander took the ebony down quicker, but needed more caution in using it. |
Here's the peghead almost ready for binding. The routing for the large scroll needs to be extended to point more towards the bottom of the picture and be pointed. I was worried about where the edge guide made the slot too deep (see 2/1/11 comments). However, after putting the binding in it I don't think I'll have to sand/file away too much peghead edge to make it flush with the binding. |
|
|
|
|
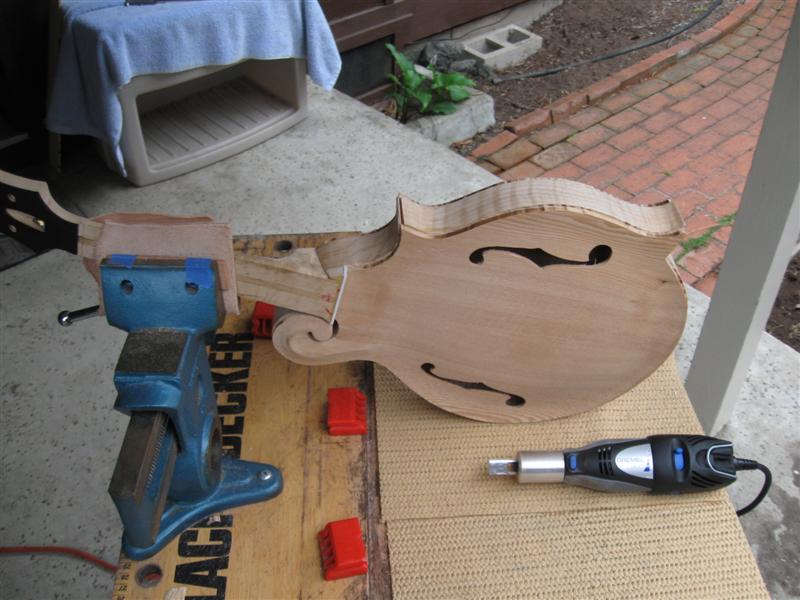
2/12/11: While waiting for something needed for binding the peghead, did the "scooping" of the fingerboard/fretboard extension. Obviously, those high frets are useless. Scooping decreases the chances of "pick clicking". |
|
I used the technique described on this webpage. Doing most of the work with a chisel, decreases the ebony sawdust produced. |
Came out pretty good. Area just before it "ramps up" is still a bit rough, though. |
|
|
|
|
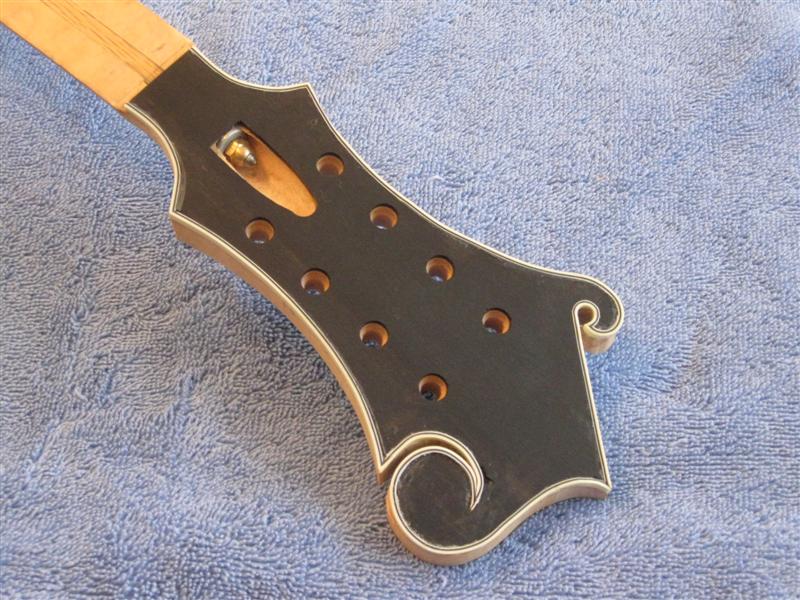
3/17/11: Finished binding the peghead. Ran out of binding and had to get some more. I'm happy with the way it came out! |
|
I did some binding slot "filling", where it was too deep, with some 0.020" black fiber purfling . Had to use 1 to 3 layers, depending on how oversized the slot was. I think once the peghead is laquered, it will be hard to see. Look for it inside the bottom binding near the "point" by the truss rod opening. |
When I was routing to extended the large scroll slot, I lost track of the Dremel bit. Routed outside where I wanted. Should be able to fill it OK, though. Really happy with the miter at the small scroll tip. Looks almost "pro". :) |
|
|
|
|
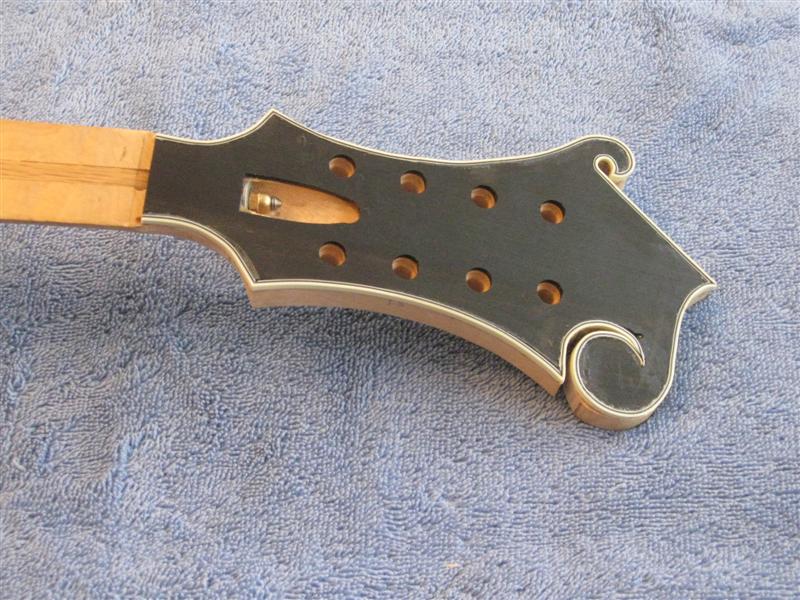
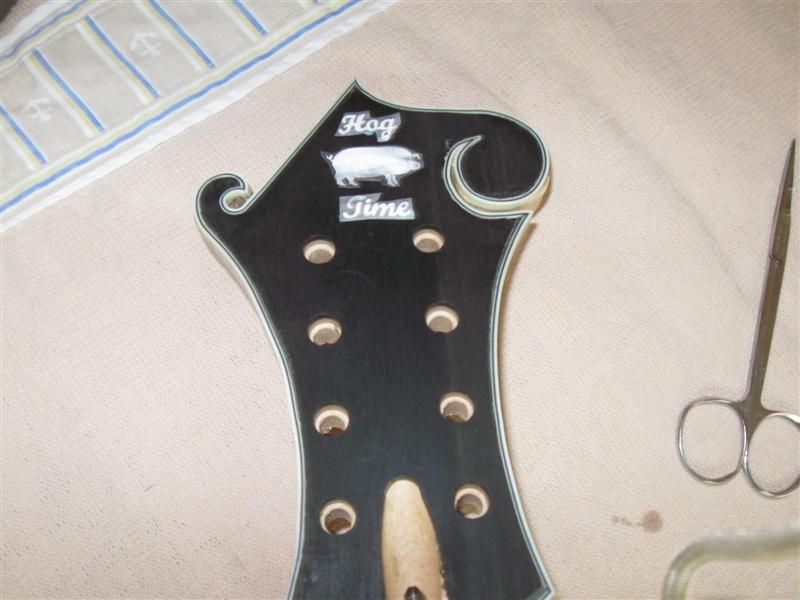
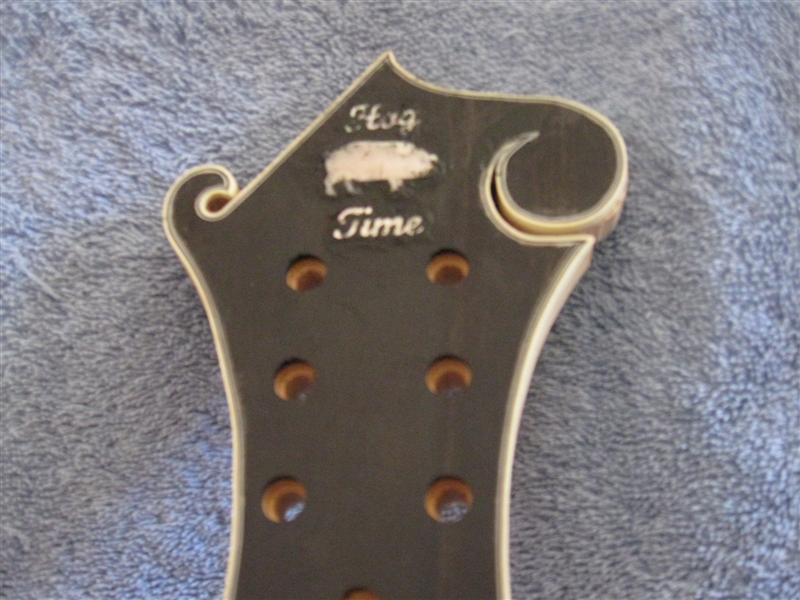
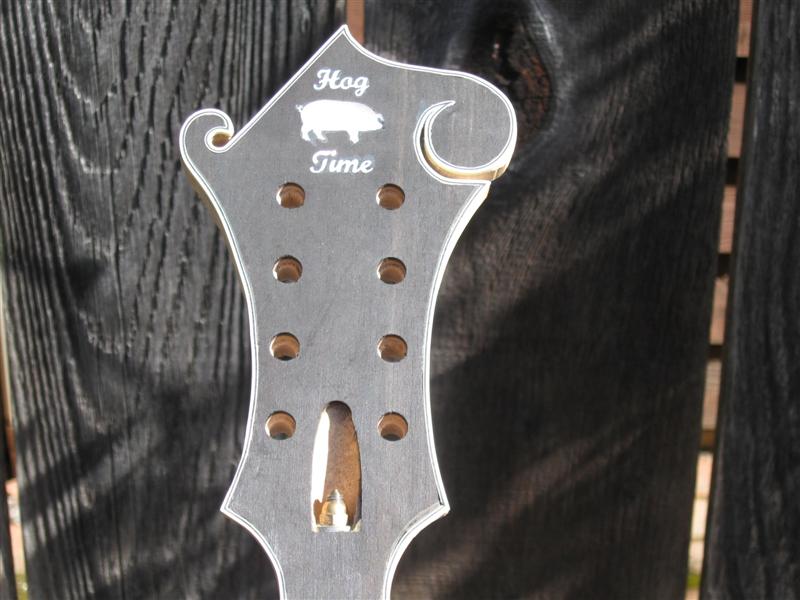
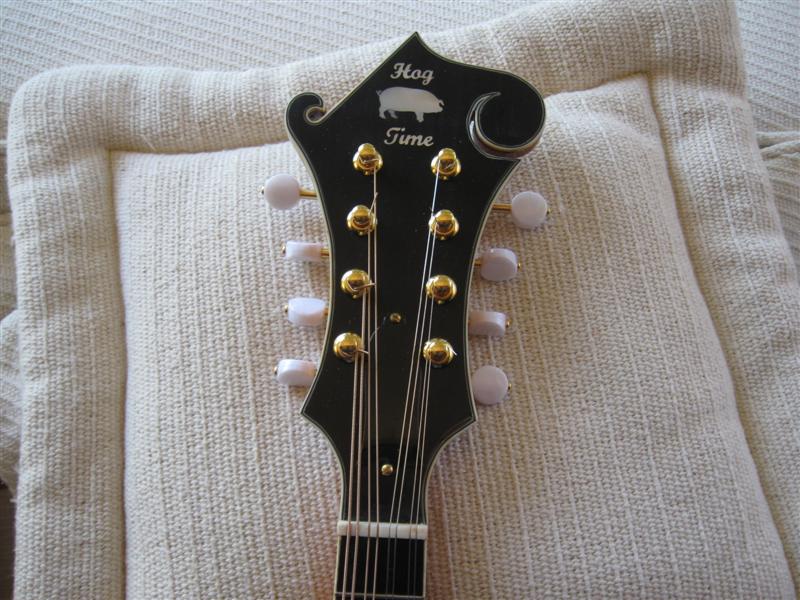
4/20/11: Finished inlaying the peghead. Came out pretty good!! |
|
Here's my final layout of the inlay pieces I had. Used paper cutouts to evaluate different possibilities. Made the cutouts by putting the actual inlay pieces on a copy machine. Got the custom inlay from Luthier Supply (Andy Depaule). Very reasonable cost. |
I investigated various ways of gluing in the inlay and filling the (inevitable, for me) gaps between the edges of the inlay and the cavity. Finally decided to glue the inlay in first with a bit of "super glue" (aka CA), put ebony sanding dust into the gaps and flood with water thin, clear CA. An alternate method is to put filler (ebony dust mixed with white glue or epoxy) in first and press the inlay into the filler. |
The final result! Looks good, except for a couple of minor problems (by my standards, not a pro's). Where the cavity gaps were noticeable (above "Time" and at the pig's rear legs) the filler is slightly lighter in color than the ebony peghead. Hopefully this won't get accented more when the lacquer finish is applied. Also, you can't tell in the picture, but the upper right of the pig is darker than the rest. This is because I sanded down about 0.015" to 0.020" of the inlay to get it level with the peghead (cavity not deep enough). The pig is translucent enough to now show the black below it. |
|
|
|
|
|
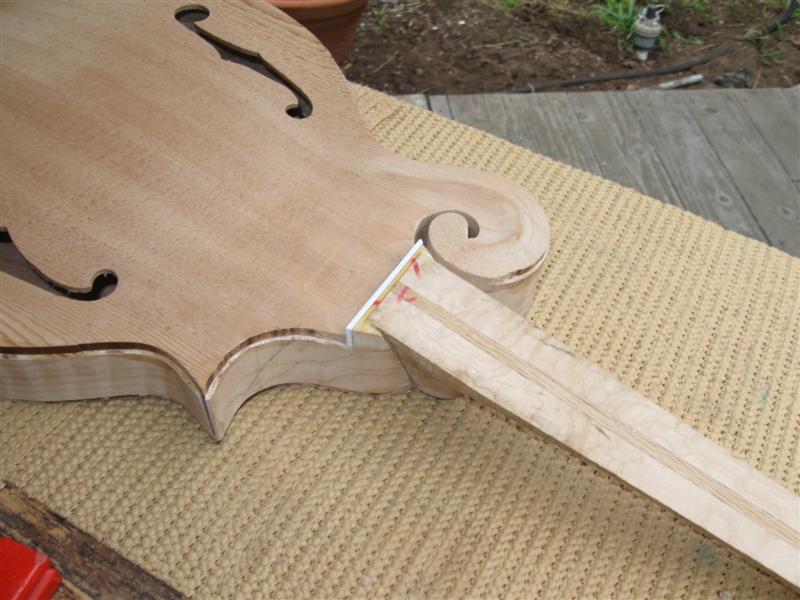
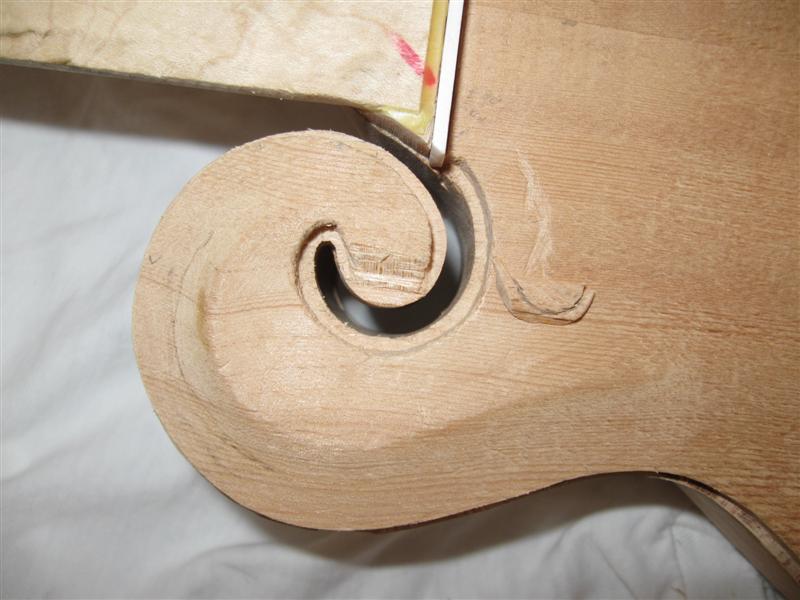
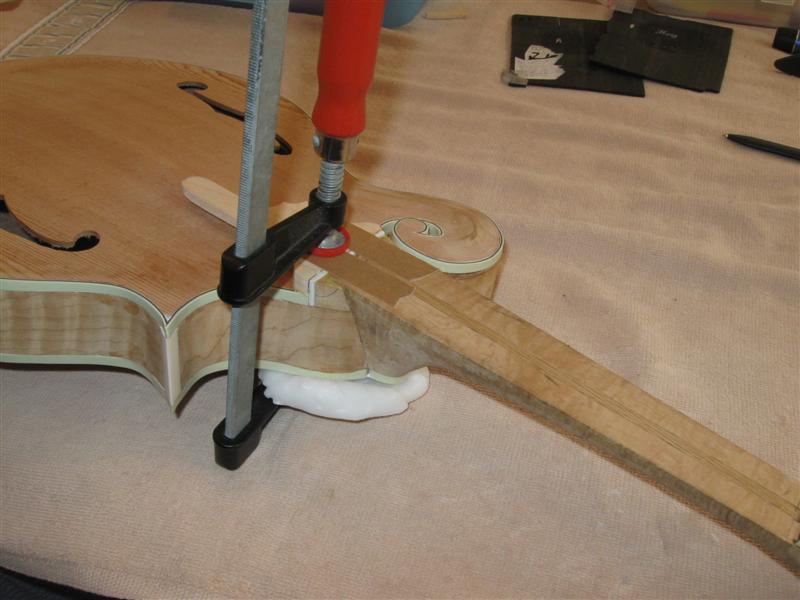
8/7/11: Had to interrupt my RV ramblin' and come back home for a short stay. Took advantage of it and got the fretboard glued on. Last piece that needs gluing! |
|
In order to clamp down the fretboard extender while the glue dried, I made a custom caul (the white piece under the mandolin body). I made it out of Friendly Plastic. You put the small white pellets in hot water and they become soft enough to mash together and mold into the shape you want. After it cools to room temperature, it's hard. I just pressed the mandolin bottom into a hunk of it and let it cool down. After the glue dried, I sanded the neck and extender flat (or close to it). Used an about 20" long board with sandpaper on it. |
To clamp down the fretboard for gluing, I purchased an oak caul from Roger Siminoff. I positioned the fretboard such that the 15th fret approximately lines up with the white crosspiece on the body. This resulted in the space for the to-be-installed nut maybe being smaller than "standard". Also when I tightened the clamps, the fretboard slipped a bit from some alignment marks I'd made. Hopefully that won't affect anything. |
Really looks like a mandolin now! :) Can't wait to hear how it sounds. |
|
|
|
|
|
11/3/11: I'm back from my annual ramblin' in my small RV. You can see where I went this year at RamblinRalph.com. Next steps are to make the neck flush with the fretboard edges and make the body binding and surrounding wood flush. None of this will noticeable in pictures, so I'll wait for something more significant to "publish". Lots of sanding/scraping/filing in my future. Ugh. :) |
|
1/5/12: Got the neck flush with the edge of the fretboard and getting closer to getting all those pesky little gaps and cracks between various pieces filled. I'm using FamoWood wood filler in the Birch color. Seemed to match my maple better than Maple color. After filling many gaps, I came up with an idea to reduce the amount of scraping and sanding of excess filler after it dried. I laid down strips of masking tape on each side of the gap, leaving only about 1/16 inch of space for the filler (see below). This really worked out well. Later I saw the same tip in a woodworking book for keeping glue off of where you don't want it. Wish I'd seen it sooner. :) A friend of mine says I'm overdoing it and worrying about gaps too small to make a difference. Hmmm, we'll see. |
|
|
|
1/30/12: Finally
got some things done to justify some pictures. Didn't get
all of the gap filling done, but most of it. Installed all
the hardware for stringing it up and did it! It sounds pretty
good, but not as "full and warm" as my Collings MT A-model.
I'm sure the sound
will change some after staining and finish and being played for
a while. Never having made a mandolin before, I'm not sure
what to expect at this stage. (Note: Links to sound files
further down the page). |
|
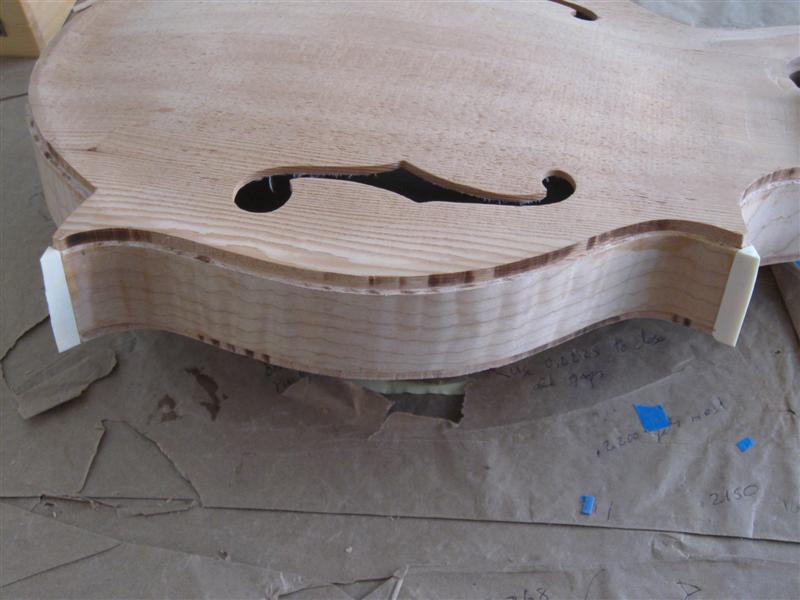
The feet of the bridge must be shaped to fit the curve of the top in the area where the bridge will sit. This increases the amount of string vibration to the top and, consequently, the sound. I did this according to instructions in Siminoff's book and the Frets.com website. You lay sandpaper (grit side up) on the top and move the bridge back and forth until the feet show scuff marks all along them. This means the bridge is making full contact with the top. Roger suggests moving the bridge inline with the neck and using a homemade fixture to hold the bridge. Below is a picture where I'm ready to go. However, after doing this a bit, I decided to use the method described on Frets.com, where you move side to side a very small amount (1/4 inch or so). I did not, though, use his method of scraping the feet with a knife. |
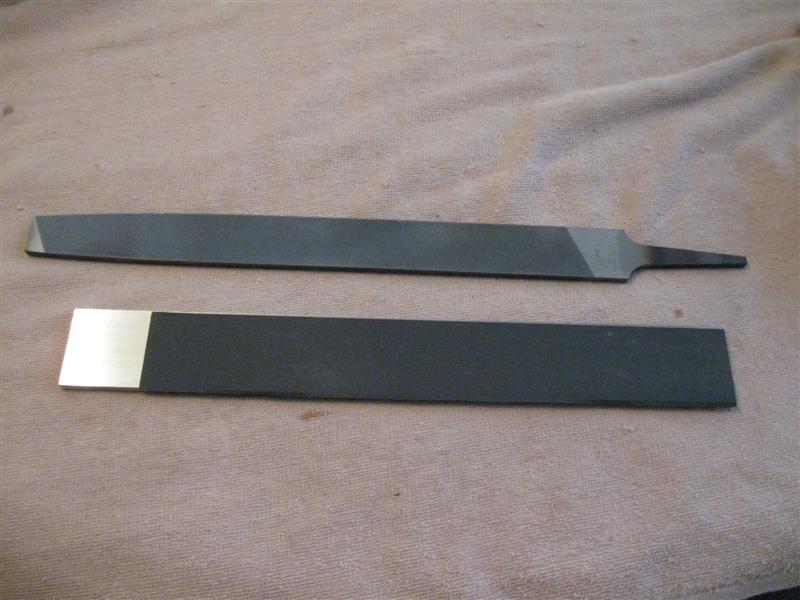
New frets needed to be leveled out, so there are no high spots. I read about different methods of doing this. Decided to try a large file. Only the treble side of the frets were being flattened. Kept working until I saw the same thing on the bass side. Oh, oh ..., frets now are a lot shorter!. I think I got carried away. Probably not going to hurt now, but when I wear grooves in the frets from hours of hot pickin', there might not be enough height left to just dress them smooth again. A refret would then be required. Oh well, I'm no youngster, so I might not outlive them. :) I finished off the leveling with 320 grit adhesive sandpaper on the very flat side of a heavy straight edge gauge. I think I should have used this from the start. Now the frets must be "re-crowned" with a rounded top. I did this a bit, but more is needed. I used a tool from StewMac. Below is the file and sandpaper device used in leveling the frets. |
Both the bridge and nut must have slots cut to keep the strings in place. Depth of the bridge slots are not that important, but the nut slot depths determine the string height at the first fret. This affects how easy the instrument plays. The bridge saddle height is adjustable with wheels. The saddle should be adjusted so the strings at the 12th fret are about 0.060 (YMMV). My saddle was "bottomed out" before getting that height (wrong neck angle?), so I had to sand down both the bottom of it and the "ears" about 0.030. I read about slotting the nut and found several methods (not surprising). The slot needs to be the width of the string. Some say it needs a round bottom. Siminoff says a "v cut" is better. I used custom made "nut saws" made from automotive feeler gauges (per some Net article). This way you definitely get the desired width, although the bottom is flat. At first I cut the saw notches in the feeler gauge with a file, then switched to using a Dremel cutting wheel, which got them closer together. I also tried cleaning tips used for acetelyne torches to cut the slots. These are round, but don't cut the bone nut very fast. |
|
|
|
* |
|
OK, here's the "almost, dern near, oh so close to being" completed mandolin. Oops, forgot hours and hours of staining and finishing, Oh well, it's a heck of a lot closer than it's ever been. I'm planning on using TransTint dye in a brownish color. I was told by the experts on the MandolinCafe.com builders' forum not to use an oil based stain from the hardware store, because I'm not building a piece of furniture. :) Not going to try the typical sunburst (easier to mess up). Not sure of what finish I'll put on it yet. I bought some low grade wood from a luthiers supply and will practice, practice, practice on it before attempting it on my baby. Here are MP3 sound files (@ 192 kbs) that compare my F5 build
to my Collings MT A-model. Same Wegan pick. Recording
chain: Rode NT5 small condensor mic, FMR Audio RNP preamp. Yamaha
AW1600 hard disk recorder (@44.1/16). Left click on file name
to play or right click to save file on your computer. Files
are about 1.5 MB each and 1 minute long. |
|
|
|
|
2/28/12: Been practicing my staining and finishing techniques on some "test wood". I'm mixing the TransTint dye with water and applying it with a rag. Works good this way, as you can make multiple "passes" until you get the color intensity you want. I've tried 2 types of finishes: Formby's Tung Oil finish (really a wiping varnish, not all tung oil) and KTM-9 water based glossy finish. I like the Formby's. Easy to apply just by wiping on with a rag. 10 to 12 coats (1 per day) gives a nice glossy finish. However, it doesn't appear to fill in the teeny "grain lines" of the wood (not sure what else to call them). If I look at it at an angle, I can see imperfections. Straight on it looks fine. Also, not as smooth as the KTM-9. I brushed on 3 coats of the KTM-9 and it looks good. However, I'm wary of using a brush for the "real thing", because of surface imperfections and a thicker finish than the varnish. Haven't tried KTM-9 spraying yet, but I'm wary of runs, with my little experience in spraying. So, final finish technique is still TBD. Also, I'm going to try a couple of other dye colors before making my final decision. |
|
The test piece below is maple. The four sections, from
left to right, have the following TransTint dye and finishes applied: Out of these two colors, I like Brown Mahogany the best. |
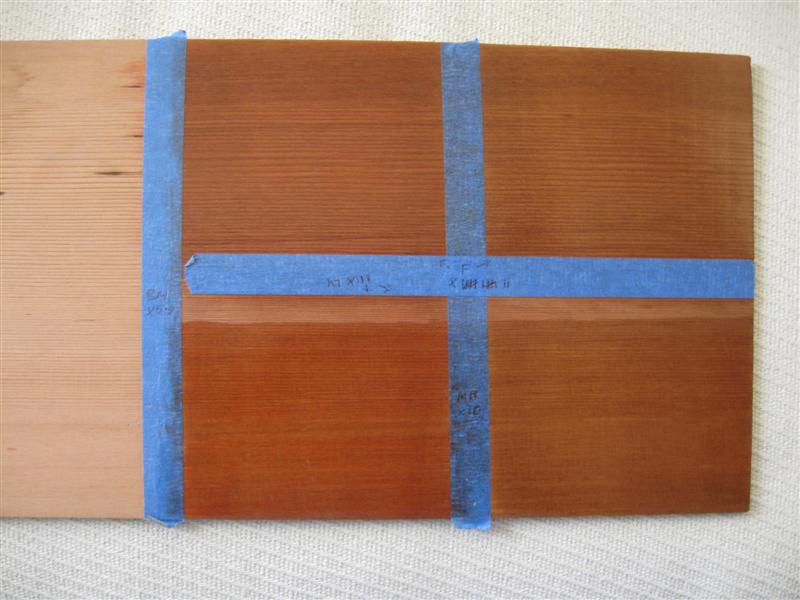
The test piece below is Western Red Cedar. My kit was supposed to have a Sitka Spruce top. However, I discovered after gluing it together that the top is cedar. Didn't know enough about wood to catch the problem. Oh well, too late now. Left half is TransTint Brown Mahogany and the right is Medium Brown. Upper part is Formby's finish and the bottom is KTM-9. Color difference not as noticeable on cedar, although the left half only has half as many dye "passes" as the right. |
|
|
|
|
3/8/12: Got another couple of colors of TransTint dye: Reddish Brown and Honey Amber. I might go for a multi-color sunburst afterall. I like the combo of the Reddish Brown and Honey Amber. I'll try another test piece and make sure I can get a nice transition between the two colors. I've about decided to use KTM-9 vs. Formby's. Not sure I'll ever get a smooth finish with the Formby's, due to the wood grain/pores. Got several opinions on this from fellow builders on this MandolinCafe.com forum thread. I've tried spraying KTM-9 both with a Preval "poor man's spray gun" and using an airbrush from StewMac. Neither were perfect, but the Preval seemed to work better. With the airbrush, I didn't get a heavy enough coat. Of course, I've hardly sprayed before, so that's part of the problem. |
|
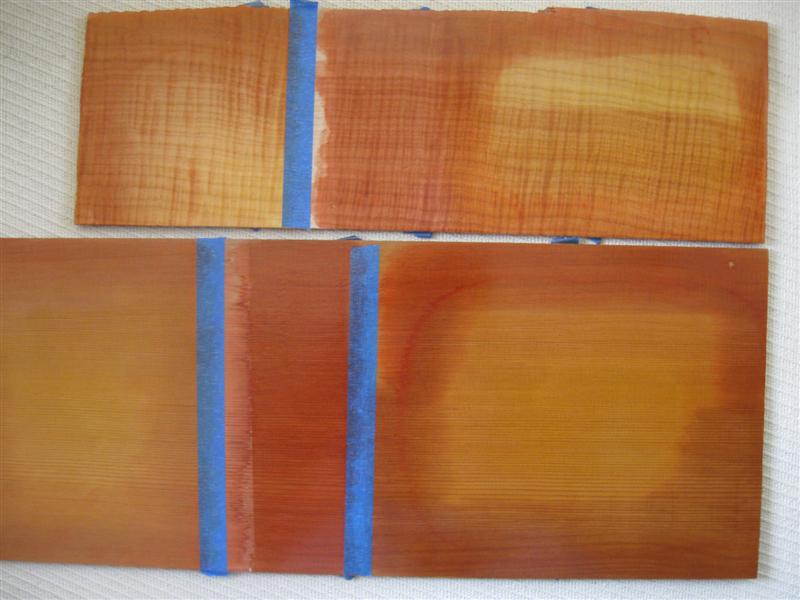
Here are 2 test pieces with the new colors (and one of the old). Top one is maple and bottom is cedar. Top: Amber over right 3/4 of piece, then Reddish Brown all around the edge of the Amber. Brown Mahogany over the bottom half of the Amber. Reddish Brown only on left 1/4. Bottom: Amber over right 3/4 of piece, then Reddish Brown around the edge of the top half of the Amber. Brown Mahogany around the edge of the bottom half of the Amber. Reddish Brown only on left 1/4. |
I sprayed about 6 coats of KTM-9 (using the Preval) on the maple piece and it looks fantastic. However, I do have several "pimples" on the surface. I'm not sure I can get a perfect surface, since I'm spraying outside and not using pro equipment. If I can figure out how to not create (or remove these imperfections), it will look great. I used the airbrush on the cedar for 4 coats and didn't like the coverage. I switched to the Preval for another 3 coats. I'm also going to get a good brush and try several coats of KTM-9 to compare to what I got with the Preval. Note: Pics below are after the KTM-9 coats. However, not very good shots to show the gloss. Areas on the left side of the boards are new sunburst tests with a more blended color line, but no gloss coat, yet.. |
|
|
|
|
3/27/12: Well, I've decided that I've procrastinated long enough and better get with the final steps, regardless of the results. Hey, if it looks crummy, I'll paint it black. :) |
|
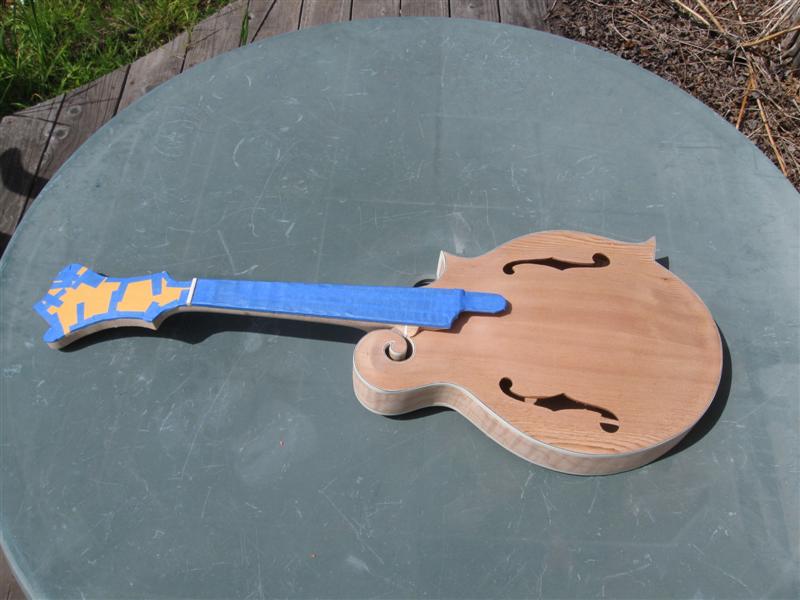
I hand sanded using 120, 150 and 220. Turned out nice and smooth, but there are some small dings in the top. Not sure if I caused them or they are a result of the carving machine. Decided to just leave them, rather than sand down the top too much. I masked off the peghead and fretboard for staining. Since part of the binding is covered, I'll have to re-mask before the applying the clear finish. |
Here's the result after applying 2 "passes" of the Honey Amber with a rag. Seems to be a lot more vibrant color than on my test pieces, where I used 4 passes. Maybe it's because I added dye plus water to my leftover stain to get more and used too many drops. I don't think it will be a problem. If it is, I'll just put a very light wash of brown over it. Applying it went very smoothly. There were a couple of areas I couldn't get to (far back under fretboard externder and peghead scroll). Have to do touch up there later. |
Here's the back with the amber only. I'll apply the Reddish Brown color in the next couple of days. This will be harder since I want to blend it into the amber for the popular sunburst effect. Hmmm, another possibility: A really yellow mando? :) Tune in later. |
|
|
|
* |
|
4/5/12: Applied the Reddish Brown on top of the Amber. I think it came out pretty good for my first try at a sunburst. Still some areas I want to try and improve, before I apply the clear finish, though. I'm a little worried about the brown being "too red". On a test piece, I'm trying a wash of very light brown over the reddish brown to see if I like that better. Got some areas where I used wood filler that stand out too much. Have to see if I can figure out how to hide them better. |
|
I got a pretty good blend between the brown and yellow areas on the top, I think. Hard to see in the picture, but some areas need some touchup. |
.On the back, I didn't get as good of color blend as the top. There is a definite "color line". I can probably live with it, but I'm trying some experiments on test wood to see if it's "fixable". I think my probem was that I let the stain dry too much before trying to blend it with a wet rag. Also, I rubbed out too much of the color in a couple of areas, while trying to blend.. |
|
|
|
|
5/3/12: I've started Road Trip 2012 in my RV. So, no work on the mando until next November. Thanks for following my build progress! |
|
11/6/12: I'm back from my annual ramblin' in my small RV. This year I went to ALASKA. Check out my trip and lots of good pictures at RamblinRalph.com. |
|
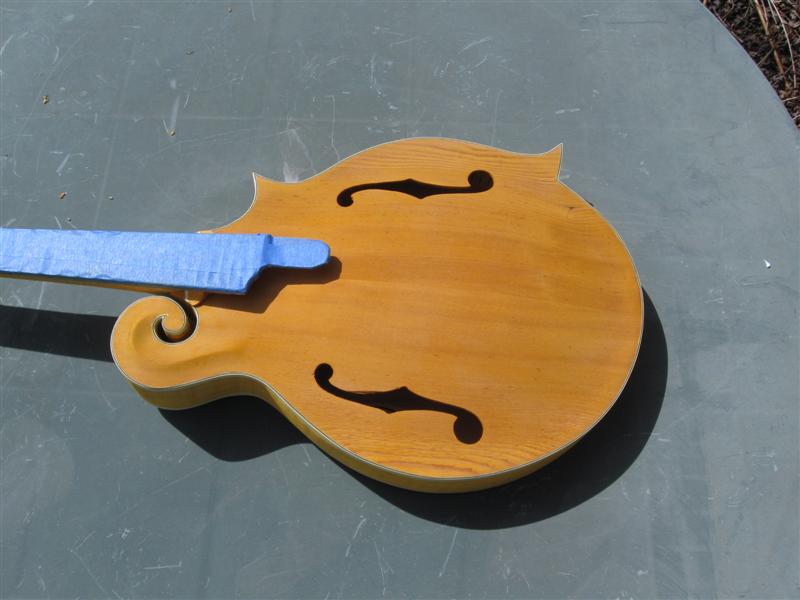
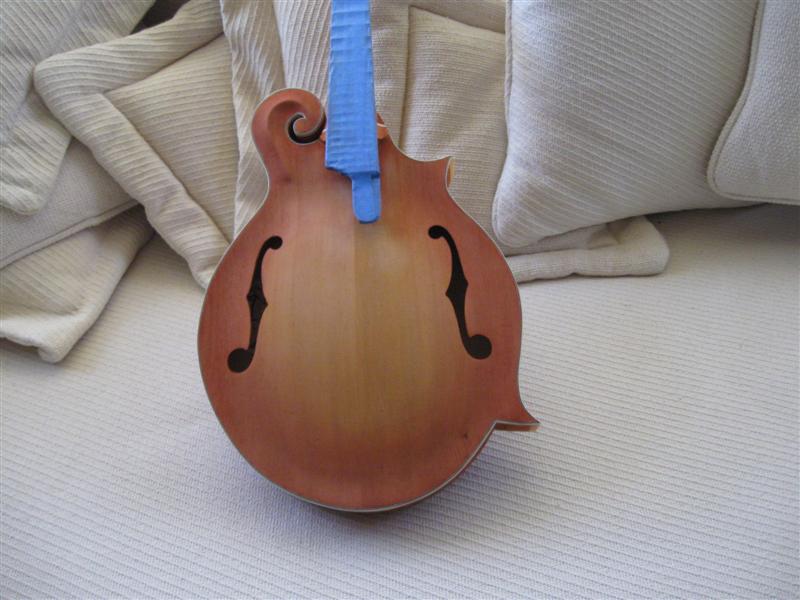
12/1/12: Been working on improving the sunburst stain on the back of my mando. Didn't like the "ring around the collar" look (see above). I'm getting very close to applying a clear, glossy finish. I've decided to go with the water based KTM-9. Will probably brush it. |
|
Here's where I stand right now with the sunburst on the back. Might do a bit more work on it, but it's close to what I want. ..... Decided this is it. Onwards and upwards! |
|
|
|
12/30/12: Getting real close to applying the finish. Came up with a fixture to hold the mando while brushing on the finish. Rechecked the mando for places that need some cleanup. Have some stain on scratches in the bone points that won't come off. I thought I could scrape the stain off, like one can on the binding. Not! Also, there are some spots on the binding where I sanded through the outer white layer into the black. Oh well, doesn't look the greatest, but won't affect how it sounds. |
|
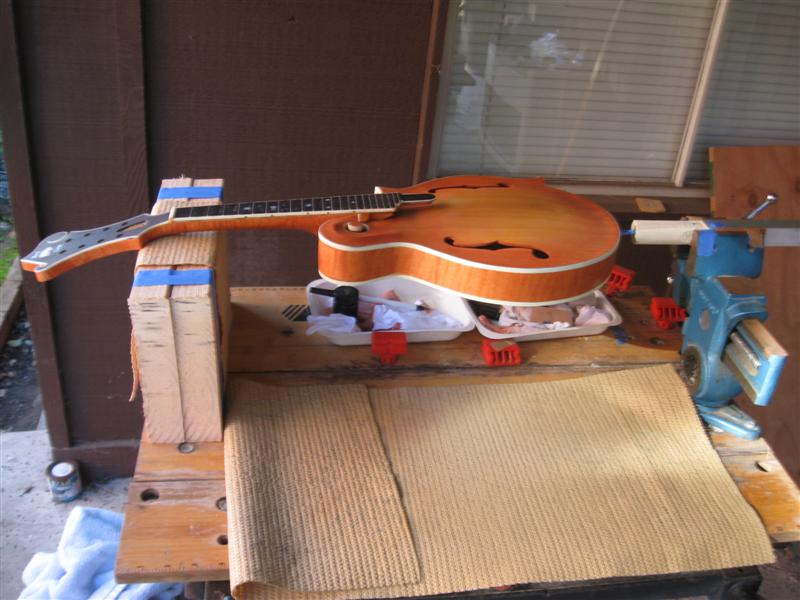
For a "mandolin holder" I took a 1" diameter wood dowel and inserted a "screw hanger" into the end. The screw part goes into the end of the mando, where the strap pin hole will be. I clamped a piece of 1" square aluminum into the vise and squared off the end of the round dowel to fit inside it. Extra work, but I wanted to be able to flip the mando over w/o using one hand to loosen the vise. Less chance of dropping my baby that way. :) |
Here's the mando prepped for applying the first coat of finish. The fretboard is masked off with the tape running the length of the fretboard. At first I applied it crosswise, but found the tape overhang would possibly interfere with applying finish to the neck binding. No problem with that by running the tape lengthwise, right at the edge of the fretboard. To keep finish from dripping through the f-holes into the inside, I inserted small ballons and then blew them up. The filler part of the ballon tended to stick out and block the side of the f-hole, so I put in small pieces of a business card. |
|
|
|
|
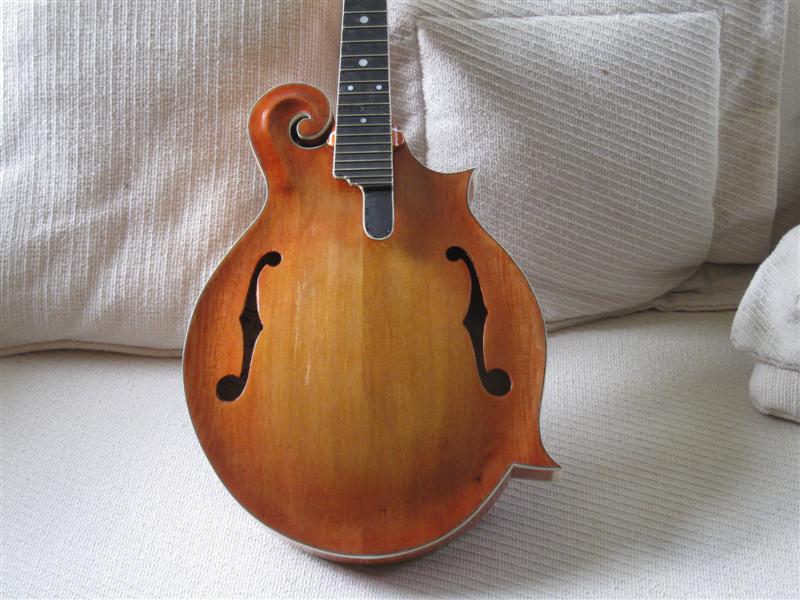
1/20/13: I applied my 8th (and final) coat of KTM-9 on my F5 today! It needs to sit for about 2 weeks for the finish to cure/harden before the final "level sanding" step, followed by polishing with successively finer grits. I'm going to use Micro-Mesh for that. After 4 coats, I sanded down well with 400 grit sandpaper to "knock down" most of the runs. I used a cotton swab and small artist paint brush to apply the finish into the scroll openings on both the body and peghead. After my first brushed on coat, I was very sorry I didn't decide to use a wipe-on finish. Lots of runs and puddles after the first coat. :( My test piece, where I first tried brushing on KTM-9, turned out very nice. However, I found out that applying the finish to a flat piece is very different than the mandolin top and back. All those undulating areas result in a too heavy coat of finish sliding down to the low spots! Plus, excessive finish on the top or back can run over the edge and down the sides. Then, when I tried to slice off the runs/puddles with a razor blade or sand them down, I ended up taking off the stain in some spots! Wasn't sure what to do at this point, so I left them. After the 4th coat, I decide to mix some stain in with a small amount of finish and apply 2 or 3 coats to those spots. This worked OK on some spots, but some others ended up too dark or still too light. At least there was some improvement. Another reason I should have used a wipe-on finish: The stain I used was a dye diluted with water. Turned out to be pretty easy to use. HOWEVER, since KTM-9 is water based, the stain re-disolved when I brushed on the first coat and I had stain drips all over my binding!! Grrrrr. Another 2 to 3 hours of work to scrape it off (deja vu time). Between this and the runs in the first coat I was really bummed out. It's lucky I'm not like a golfer than bends his clubs after a bad round. :) I sure hope someone learns from my mistakes and saves themselves some woe. :) |
|
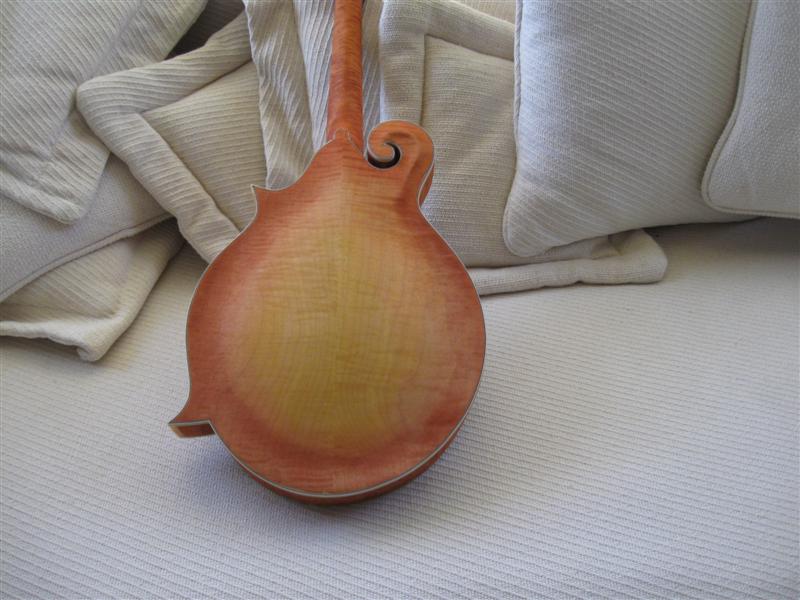
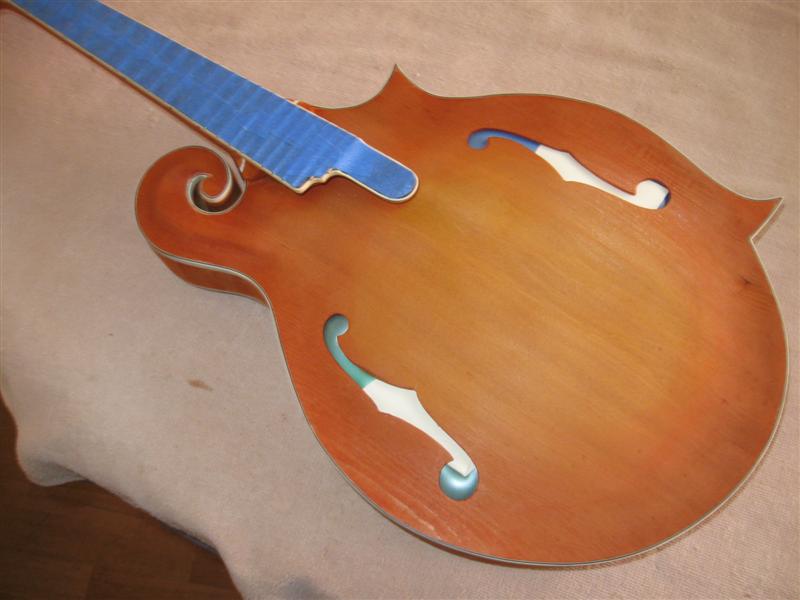
I'm very happy with the way the back turned out. The maple has beautiful figure in it. Too bad when I'm jamming the back isn't visible. :) Note: This pic doesn't really show the glossy nature of the finish. |
The top is a different story, partly because it's a different wood without any figure. Also, the top has most of the "poor stain" spots, which are staring right out at my jam partners! At first, I wasn't wild about the overall color and look. However, after taking off the fretboard masking tape and f-hole covers I think it might look good in the end. Note: Those streaks near the bass f-hole are brush marks that will be sanded out later. |
|
|
|
|
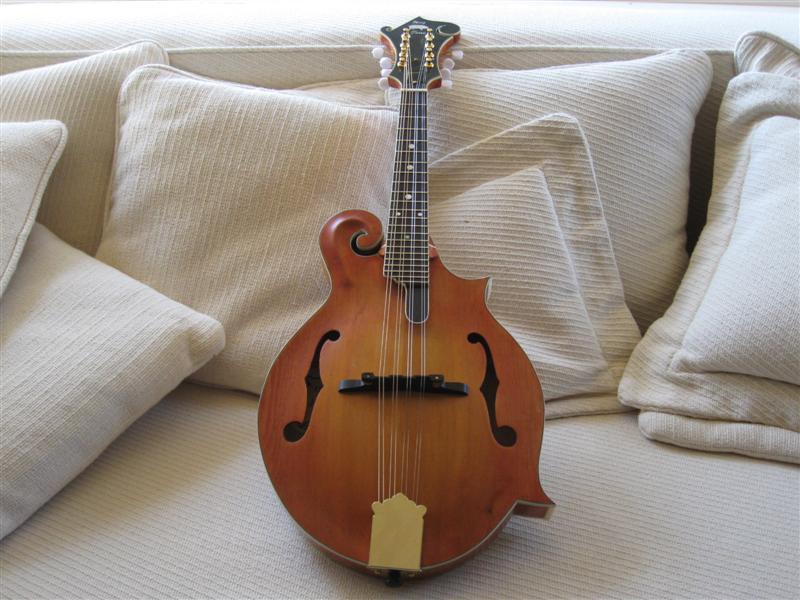
1/20/13 to 4/20/13: Did the level sanding of the KTM-9 finish with Micro-Mesh grits starting at 1500. Worked on up to 12,000 for an attempted glossy finish. However, ended up more between a matte and semi-gloss. The gloss is most noticeable when a surface is viewed at an angle. On the top, I started getting some sort of streaking in the finish, so I stopped at 6000 grit. Not sure what was going on, but I might have gotten down to a layer of finish that had some of the stain disolved in it. Worked on putting a better crown on the frets. When leveling them, I make them way too flat. Consequently, it was hard to get a crown on them. I used a concave StewMac 4490 crowning tool (the narrow side). However, this tool was made for guitars and the narrow side was still somewhat wider than my frets. This might have contributed to my crowning problems, although I think my inexperience was the big cause.. Very difficult to determine if there was a decent crown or not, since the frets are so narrow (and my eyes so old). Finally gave up with the hope it would play OK. Installed the tuners and tailpiece. Added the strings and bridge, and positioned the bridge for proper intonation. Did a preliminary setup based on info from the Net. Hey, it plays pretty nicely! :) Maybe even easier than my Collings and Flatiron A's. Sounds pretty good, but not as "full & warm" or loud as my A's (same results as "in the white"). I put a ToneRite "play-in device" on it for a week. It vibrates the strings, which vibrate the top. This simulates what happens when playing the instrument. I'm not sure it did much good, although well known luthiers/players say it does. Unfortunately, I didn't make "before and after" recordings. Maybe a lot of jamming and further set up will help it. |
|
|
|
|
|
|
|
* |
|
Summary: It's been a long, long project. I ended up with plenty of cosmetic defects, but I think it turned out as well as I could have expected, since I had no prior related experience. Definitely not an easy job. Looks good from six feet, though! :) Doubt I'll build another mandolin and definitely not an F model. However, I'm thinking about building a ukulele (from a kit) for my granddaughter's 5th or 6th birthday. Got to use all those tools I bought for something else. :) Hope you've enjoyed reading of my trials and tribulations and maybe bypassed some problems in your own build because of them. Feel free to email me with any questions. |


